guides / camping tips
Camping Water Containers and Portable Sink Stations
Choose a camp water container, spigot and portable sink setup by capacity, carrying weight, hygiene and legal gray-water disposal.
This article may contain affiliate links. If you buy through them, Keepsake Camp may earn a commission at no extra cost to you. See our Affiliate Disclosure.
A camp sink can look impressively civilized while quietly failing at its two jobs: dispensing clean water without contaminating it and catching dirty water without leaking into the campsite. The counter, mirror and towel hook are optional. The water path is not.
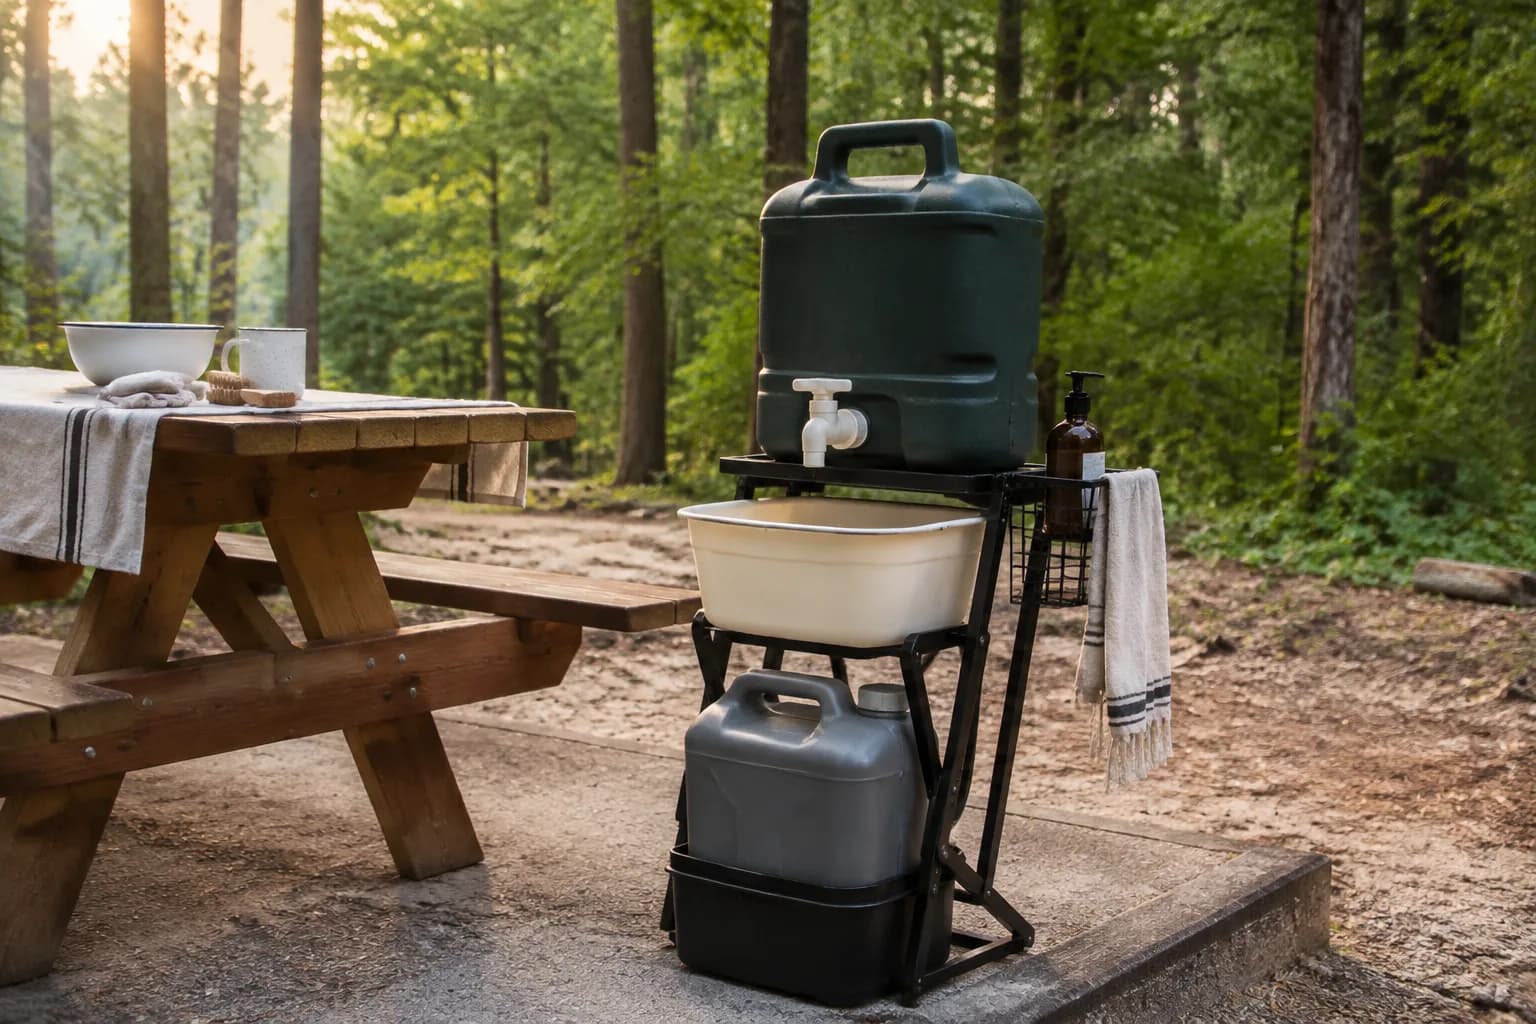
For most car campers, our pick is a two-container gravity system: one dedicated potable-water container with a covered spigot, plus one clearly labelled closed container or approved facility for gray water. Add a simple basin and soap dispenser. A powered or foot-pump sink earns its space only when frequent handwashing, children, accessibility needs or a large group makes hands-free flow genuinely useful.
Keepsake Camp did not physically test the individual containers or pumps discussed in this guide. This guide compares systems and purchase criteria, not products we cannot honestly rank.
Choose your setup in 60 seconds
| Camping situation | Best starting setup | Why | Skip or upgrade when… |
|---|---|---|---|
| Couple at a developed campground with potable taps | 10–20 L rigid jug with covered spigot + basin | Simple, stable and easy to refill | The tap is far away or frequently unavailable |
| Family car camping | Two manageable rigid jugs + separate wash basin | Splits the carrying weight and preserves a reserve | Handwashing volume or mobility needs justify a pump |
| Group camp kitchen | Multiple labelled potable jugs + hands-free wash station + closed gray tank | Separates drinking, cooking and handwashing demand | The campground provides a proper utility sink nearby |
| Small vehicle or occasional trip | Collapsible container + rigid drinking reserve | Saves storage space after use | The flexible container slumps, leaks or cannot be cleaned fully |
| Dry campsite with no reliable water | Several rigid containers, not one giant tank | Redundancy if a cap, vent or spigot fails | Your vehicle payload or tie-down plan cannot handle the load |
| Walk-in or backcountry camp | Collapsible carry container sized to the source and route | Lower packed bulk | This article is not a backpacking hydration plan; verify treatment and local rules |
The central rule: buy the system that works when full. An empty five-gallon jug is friendly. Add water and it weighs about 42 pounds before the container itself joins the trip.
Start with water weight, not product photos
One litre of water weighs about one kilogram. One US gallon weighs roughly 8.34 pounds. That produces a useful reality check:
| Nominal water volume | Water weight alone | Practical implication |
|---|---|---|
| 5 L | 5 kg / 11 lb | Easy for many adults to lift and pour |
| 10 L | 10 kg / 22 lb | Manageable one-handed for some, two-handed for others |
| 20 L | 20 kg / 44 lb | Needs a deliberate lift, shelf and tie-down plan |
| 5 US gal / 18.9 L | 18.9 kg / 41.7 lb | Common capacity; not a casual walk from a distant tap |
This is why we usually prefer two smaller containers over one oversized container for family camping. You gain redundancy and make refilling easier. The trade-off is more caps, more storage footprint and more parts to clean.
Do not use this table as a drinking-water prescription. Required consumption changes with heat, exertion, health, cooking and local guidance. Its purpose is to reveal what the container will weigh and whether you can safely carry, secure and dispense it.
Calculate container capacity without pretending one number fits everyone
Use the calculator to estimate container capacity and full carrying weight, then use the worksheet to challenge its assumptions. The inputs are planning values, not medical hydration advice.
Keepsake Camp capacity check
How much container capacity will your plan carry?
Enter your own drinking, cooking, handwashing and cleanup assumptions. This estimates storage and weight; it does not tell a person how much to drink.
Planning result
Carry at least 33.6 L across 4 containers of up to 10 L.
That is about 74.1 lb of water. Each full 10 L container holds about 22.0 lb before the container itself. Split the total differently if that lift is unsafe or awkward.
Inputs are planning assumptions. Increase or change them for heat, exertion, health, cooking and official destination guidance. Verify the refill rather than treating it as guaranteed.
Use this worksheet before buying:
1. List demand by job
| Water job | People × events × amount you normally use | Planned total |
|---|---|---|
| Drinking | ||
| Cooking and hot drinks | ||
| Handwashing | ||
| Dishwashing | ||
| Pet water | ||
| Emergency reserve | ||
| Total between reliable refills |
Measure one normal camp-style handwash and one meal cleanup at home rather than inventing precise consumption. Multiply by the number of people and uses between refills, then add a reserve appropriate to the destination and conditions.
2. Verify the refill, then distrust it a little
Record:
- whether the source is currently potable;
- seasonal shutoff dates or advisories;
- walking distance from the site;
- whether filling large containers or attaching a hose is permitted;
- the latest time the facility is accessible;
- the backup source if the tap fails.
A campground icon marked “water” does not always mean an RV-fill hose, year-round operation or a tap beside your site.
3. Split capacity into failure-safe pieces
Instead of one container holding the complete supply, divide it so one cracked cap does not become the group’s entire water emergency. Label drinking water separately from utility or untreated water.
Our default hierarchy is:
- a protected potable-water reserve that stays closed;
- a dispensing container used throughout the day;
- additional utility water only when its source and use are clearly labelled;
- a separate gray-water receiver where required.
What makes a safe potable-water container?
The CDC recommends a durable container with one small opening that closes tightly and a narrow neck that allows water to be poured without hands or objects entering the reservoir. It also says never to reuse containers that held toxic chemicals such as bleach, pesticides or petroleum products.
Use this purchase checklist:
- Dedicated to potable water: the manufacturer identifies the intended use; do not guess from appearance.
- Tight cap: dust and insects do not get an invitation.
- Covered spigot or narrow pour opening: water exits without cups or hands entering the reservoir.
- Cleanable interior: you can reach or effectively clean every internal surface.
- Replaceable gasket and spigot: a tiny failed seal should not retire the whole jug.
- Stable when dispensing: the container does not roll, fold or tip as the level changes.
- Useful vent design: flow is controlled without leaving a large opening exposed.
- Carry points that work when full: inspect the handle, not only the capacity label.
- Opaque or shaded storage: the CDC recommends keeping stored water cool and away from direct sunlight.
Health Canada’s federal-jurisdiction guidance includes similar provisions for portable potable-water containers: keep them securely closed, use them only for potable water and dispense in a way that prevents contamination. A “BPA-free” badge alone does not answer those practical questions.
Rigid, collapsible or pump sink?
Rigid jug with gravity spigot: best default
A rigid jug is easier to secure, clean and place on a table or stand. Gravity creates flow without batteries, wiring or a pump line sitting in water.
Choose it for: most developed and drive-in camping.
Main drawbacks: bulky when empty, heavy when large, and cheap spigots can drip. Test the cap, vent and spigot at home with the container full.
Collapsible container: best when empty space matters
Collapsible containers pack down after the trip and can be useful for carrying from a nearby source. Their weak points are structure and cleaning. A soft wall can fold around the outlet, and creases can be difficult to dry completely.
Choose it for: secondary capacity, walk-in sites or occasional use where packed size matters.
We would not make it the only drinking-water container until it has passed a full overnight leak test, a dispensing test and a cleaning/drying test.
Foot-pump sink: best for hands-free family or group use
A foot pump lets a camper wash both hands without touching the tap. That is useful around food preparation, with children or where hand mobility makes a small spigot awkward.
The complete system must include more than the attractive white basin:
- fresh-water reservoir;
- pump, tubing and fittings;
- soap within reach;
- catch basin or gray-water tank;
- stable floor contact;
- cleaning and drying access;
- repair plan for the pump or hose.
Choose it for: frequent group handwashing or a semi-permanent base camp.
Skip it for: a couple who can place a gravity jug over a basin. More plumbing is not automatically more hygiene; sometimes it is simply more plumbing.
Electric pump: convenience with a dependency
Rechargeable pumps can deliver easy flow from a water container. They also introduce battery state, charging, tubing hygiene and compatibility questions.
Choose one only if you can verify:
- the pump’s materials and intended water use;
- how every wet component is cleaned and dried;
- whether the flow wastes water for your use;
- how the pump is secured during transport;
- what happens when the battery is empty.
For drinking water, never assume a generic transfer pump is suitable merely because its tube fits the opening.
Build the station in three zones
Zone 1
Clean supply
Closed potable reserve plus a stable daily dispenser. Keep both away from fuel and dirty equipment.
Zone 2
Wash point
Controlled flow, soap, basin and drying method. Keep the spigot out of the dirty-water path.
Zone 3
Gray-water capture
Catch every drop, label the receiver and dispose of it only as the local land manager allows.
Flow should move in one direction: protected supply -> washing -> legal disposal. Do not move tubing, taps or basins back into the potable zone after wastewater contact.
The most useful camp sink is a small workflow, not one product.
Zone 1: clean supply
Place the potable container above the basin on a stable surface. Keep its spigot from touching dirty hands, cookware or the basin. Store the reserve closed and away from fuel, chemicals and direct sun.
Zone 2: washing
Keep soap and a drying method within reach. The USDA recommends soap and water for handwashing and stresses separation between raw and cooked food equipment. If running water is unavailable, it advises bringing safe water rather than trusting a clear-looking stream.
For dishes, scrape food into the trash first. This reduces water demand and keeps scraps out of the gray water.
Zone 3: wastewater
Position a basin or hose so every drop is captured. Label the receiver GRAY WATER — NOT DRINKING and keep it physically separate from potable containers.
The right disposal method is site-specific. Some developed campgrounds require gray water in a utility sink, toilet or dump station and prohibit ground disposal. Some backcountry guidance permits strained water to be scattered far from water, trails and camp after food scraps are packed out. The local land manager’s rule wins. Check it before building a station that has nowhere legal to drain.
Three setups we would actually build
The simple weekend station
- one 10–20 L rigid potable jug with covered spigot;
- one stable stand or table;
- one removable basin;
- soap and towel;
- one sealed gray-water container if the campground requires collection.
This is enough for most couples at a developed campground with a verified refill. Spend money on a reliable cap and spigot before buying a cabinet that makes the campsite look like a tiny outdoor restaurant.
The family station
- two smaller rigid potable containers instead of one difficult lift;
- a closed reserve and an active dispenser;
- hands-free foot pump or easy lever only if it improves use;
- separate handwashing and dishwashing basins where space permits;
- a child-safe stable platform;
- labelled gray-water capture.
The best upgrade is often not more capacity. It is placing the station where everyone can use it without touching food-storage equipment or walking through the cooking zone.
The dry-camp station
- several secured rigid containers;
- separate drinking reserve;
- low-flow dispenser;
- menu designed for less cleanup;
- wash basin and guaranteed legal gray-water capacity;
- verified refill location saved offline;
- backup treatment method appropriate to the source.
If natural water may become part of the plan, storage does not make it safe. Use our separate camping water-treatment guide for boiling, filtration, disinfection and contaminant limits.
The at-home test that prevents campsite surprises
Run this test at least a day before departure:
- Wash and prepare the container according to the manufacturer’s directions and current public-health guidance.
- Fill it completely with safe water.
- Dry the exterior and place it on cardboard or paper overnight.
- Open and close the vent and spigot repeatedly.
- Dispense into the actual basin without holding the jug.
- Carry it the same distance and height expected at camp.
- Confirm it can be secured in the vehicle while full.
- Empty, clean and air-dry every wet part.
If you cannot dry the container, cannot lift it safely or discover a slow wet circle beneath the spigot, the problem is real. Better to meet it on the kitchen floor than beside a dry campground tap.
Cleaning and storage
Follow the product manufacturer’s instructions first. The CDC says safe-water containers should be cleaned regularly and provides a sanitation procedure using unscented household bleach at a specified concentration. Bleach products vary, so use the current CDC instructions rather than copying a remembered ratio from an old camping forum.
General practice:
- wash and rinse before sanitizing;
- disassemble removable caps, gaskets, vents, taps and tubing;
- use safe water for the final rinse when instructed;
- allow every part to air-dry fully before storage;
- store caps loose enough for drying, then protect components from dust;
- inspect seals, odour, residue and damage before the next fill;
- never move a spigot or tube from a gray-water container to a potable one.
Replace parts that remain slimy, cracked, odorous or impossible to clean. Sentimental attachment is excellent for camp mugs, less so for mystery biofilm.
Buying scorecard
Score each candidate from 0 to 2. Reject any container that scores zero on intended potable use or cleanability.
| Criterion | 0 | 1 | 2 |
|---|---|---|---|
| Intended use | Unclear | Utility water only | Clearly intended for potable water |
| Full-weight handling | Unsafe or awkward | Manageable with help | Safe for intended user |
| Dispensing | Requires dipping/contact | Open pour | Covered tap or controlled narrow opening |
| Cleaning | Interior cannot be cleaned/dried | Some parts difficult | All wet parts accessible or serviceable |
| Stability | Tips or collapses | Needs support | Stable on planned stand |
| Repairability | Sealed, no parts | Generic replacement possible | Gaskets/spigot sold separately |
| Vehicle security | No reliable tie-down | Improvised restraint | Positive restraint in planned location |
| Gray-water match | No capture plan | Basin only | Complete legal capture/disposal path |
Do not crown the highest total automatically. Safety gates come first; the score helps compare the candidates that remain.
What we would skip
- One enormous container for the entire group: one leak, one unusable handle and no reserve.
- A reused chemical jug: the CDC explicitly warns against containers that held toxic substances.
- An uncovered bucket for drinking water: hands, cups and debris can enter the supply.
- A sink without a wastewater plan: that is a basin-shaped postponement.
- A pump whose tubing cannot be cleaned and dried: convenience does not outweigh uncertain hygiene.
- A DIY frame that places 40 pounds of water on an unstable table: calculate the full load before building.
- Universal gray-water advice: campground, park and backcountry rules differ.
Pack this water-station card
- Potable source verified for the dates of the trip
- Required capacity measured by actual group uses
- Reserve separated from daily dispenser
- Full container lift and leak test passed
- Spigot, vent, gasket and tubing inspected
- Containers labelled: potable / utility / gray water
- Soap and hand-drying method packed
- Food scraps strainer and trash bag packed
- Local gray-water rule saved offline
- Disposal facility or carry-out capacity confirmed
- Backup source and treatment plan confirmed
- Containers secured away from fuel and chemicals
Pair this system with the camping essentials guide and the weekend camping checklist. The container solves storage and dispensing; it does not replace source verification, treatment or destination-specific rules.
FAQ
What size water container is best for camping?+
For many car-camping groups, one or two containers in the 10–20 L range are easier to lift and secure than one oversized tank. Calculate the water needed between reliable refills, include cooking, handwashing and cleanup, then divide the total into manageable containers with a separate reserve.
Is a collapsible or rigid camping water container better?+
Rigid containers are usually easier to clean, secure and operate with a spigot. Collapsible containers save storage space and can work as secondary capacity, but they need testing for leaks, stability and complete drying. We would not depend on one untested collapsible container as the only supply.
Can I use any plastic container for drinking water?+
No. Use a container clearly intended for potable water, with a tight cover and a dispensing design that limits contamination. Never reuse a vessel that held bleach, pesticides, fuel or other toxic chemicals.
Do I need a pump for a camping sink?+
Usually not. A gravity jug over a basin is sufficient for many couples and small families. A foot pump becomes worthwhile for frequent handwashing, group kitchens, children or accessibility needs. An electric pump adds charging and cleaning requirements.
How do I dispose of dishwater while camping?+
Follow the rule of the specific campground or land manager. Developed campgrounds may require capture and disposal in a utility sink, toilet or dump station. Some backcountry authorities permit strained water to be dispersed under specific conditions. Never assume biodegradable soap makes disposal anywhere acceptable.
How should I clean a camping water container?+
Follow the manufacturer’s procedure and current public-health guidance. Wash and rinse the container, sanitize it using an approved method, and air-dry every component completely. The CDC publishes current instructions for cleaning and sanitizing safe-water storage containers.
Can the same container hold drinking water and gray water on different trips?+
We would not do that. Keep potable and wastewater equipment permanently separate and clearly labelled to reduce cross-contamination risk.
Sources reviewed
Fact-checked Sep 8, 2026
These references support factual or safety-sensitive claims in this article. Access dates show when our editors last verified the source.
- CDC — Safe water storage
Official source · Accessed Sep 8, 2026
- CDC — Water treatment while hiking and camping
Official source · Accessed Sep 8, 2026
- USDA FSIS — Food safety while hiking and camping
Official source · Accessed Sep 8, 2026
- Health Canada — Guidance for providing safe drinking water
Official source · Accessed Sep 8, 2026
- Leave No Trace — Dishwashing in the backcountry
Expert guidance · Accessed Sep 8, 2026
- National Park Service — Crater Lake campground gray-water rules
Official source · Accessed Sep 8, 2026
- National Park Service — Point Reyes water and gray-water guidance
Official source · Accessed Sep 8, 2026